
Last year I completed a project in my house to wire most of it with cat 6 Ethernet cable. See how I did it with lots of pictures.
Before we get started: I want to direct you to my photos on Imgur. I’ve got 68 pictures that show the process all the way through. Too many to post here.
Why Wire the House with Ethernet?
The initial driver was Google Fiber was supposed to be coming to my community. While it did come it didn’t for some reason make it to my local neighborhood. All is well though because AT&T is now digging in my yard to lay underground fiber cable. In addition I also wanted to lighten the burden on WiFi. I have at last count 22 different internet connected devices in the house. That’s a lot to run through wireless connections.
When it comes to reliability, speed, and security nothing beats wired connections. I cannot wire everything but the more I can hook up the better it will be.
Blueprint
Disclaimer: I am not very handy around the house. I’m a software engineer – most things hardware related or mechanical puzzle me.
Good thing my wife is and was able to help me. You really need someone else to help because it is difficult to run through floors by yourself.
Pro Tip: this is not a 1 man job. You need at least 1 more person to help you.
Tools Needed
I’ve lived in apartments most of my adult life. A few years ago I became a home owner. Therefore I had to buy many tools for various tasks. I needed to buy most of the tools I used in this project. Ignore the hammer, gloves, rope, and crowbar.


The key tools used were:
- drywall saw
- spade bit drill bits
- fiberglass wire running kit
- fish tape
- drill
- stud finder
- utility knife
- level
- black electric tape
- punch-down tool
Materials Needed
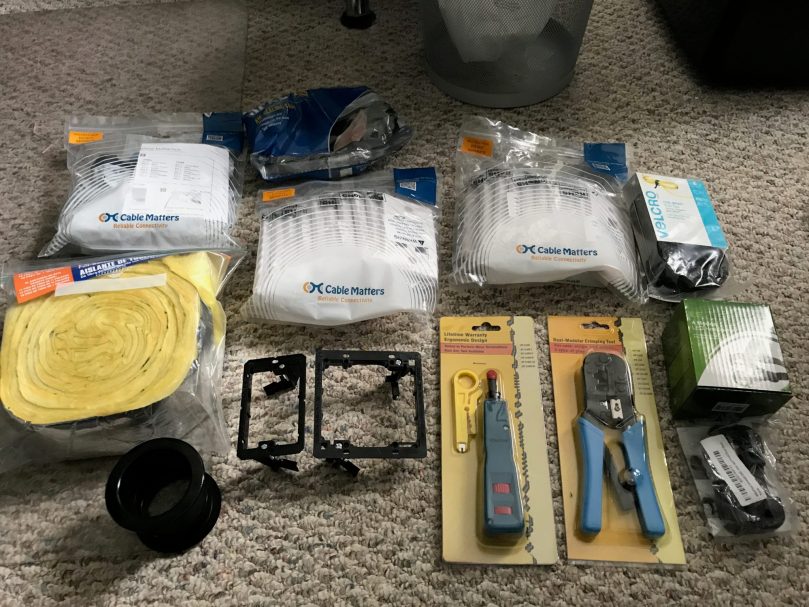
Pictured here (top to bottom, left to right) are:
- keystone jacks
- 2 outlet wall plates
- 4 outlet wall plates
- Velcro cable ties
- pipe insulation
- grommet
- single and double gang mounting brackets
- punch-down tool
- crimper
- the thingy that holds the keystone jack while i punch down the individual Ethernet wires

Shorty 3 foot Ethernet cables. These are for connecting to the patch panel I will install to the 24 port switch I already have. Decided it would be better to buy rather than make from my bulk supply.

Decided to go with Category 6 Ethernet cable. This isn’t cheap but I still oped for 1,000 feet over 500. That turned out to be a good decision.

Installed this patch panel right by the Ethernet 1,000 foot box. This is where my network equipment will live. All of the connections will be tied into the patch panel – the other end of the cable into whatever outlet I’m sending it to.

A project within a project – also decided to run wires behind the TV I have mounted to the wall. I want to minimize the wires hanging so I got these to do the job. This was a good opportunity to take this on because we had to move the TV anyway.
Costs Breakdown
This is approximately what it cost to gather the tools (those I didn’t have) and materials. Your costs will vary depending on the tools you already possess. Most items I purchased off Amazon, Harbor Freight, and Monoprice.

Implementation Step By Step
I am running cables through 3 floors to various rooms. The source will be on the 3rd floor attic where my networking equipment lives. From there it will be run over behind the walls into the unfinished part of the attic and dropped to the 2nd floor. Then it drops again into the garage (easier to work with). I can then run it under my house in the crawl space and come up in the 1st floor.
I had very little Ethernet cable left when I finished. Glad I didn’t get 500 feet instead.
Attic
All of the work began at the top in the attic. From there everything would be dropped down.
The patch panel was mounted first. Installed this patch panel right by the Ethernet 1,000 foot box. This is where my network equipment will live. All of the connections will be tied into the patch panel – the other end of the cable into whatever outlet I’m sending it to.

Jumping ahead – this is what it looks like once all the cables are run before we terminate into the patch panel. This is my makeshift networking area until I get a stand for it. I’ve got a cable modem, wireless AC router, 24 port switch, all plugged into an APC battery backup. Yes – I will have internet even when the power goes out!

This is the other side of the wall. The insulation stuff nicely and the hole is more than big enough for all the cables.

See beyond the hot water tank? That’s where the cables need to go. Not fun and not easy to take pictures. Fortunately my wife fit easier through there and was able to pull and drop cables I fed her.

Jumping ahead – after all the wires were run I tidied up a bit. I didn’t do this until the end because I wanted to be sure there was enough wiggle room for all cables.
Outlets were installed for 2 rooms in the attic. I don’t have many pictures of them.
2nd Floor

Here is the drop from the 3rd floor attic down to the 2nd floor. I had to remove a big chunk of drywall to get at it because I needed to fit my arm in there to use the drill. Space was very limited in the attic so the hole had to be drilled here. A fiberglass pole is shown through the hold.

Drilling through floorboards is tough. I used 1 inch spade bits for my drill to make the holes. It was a lot harder than I thought to drill through floors. Since I was standing on a small ladder and looking up there was sawdust coming down on to my sweaty face the whole time. Good times…

Had to run all the way down the wall. Pulling through insulation was not fun at all.

I made a mistake (hole on right) and misjudged where a stud was and had to drill another hold. It also had to be big so I could cram my arm down there to drill through the floor boards. This part was not easy.

The is the drop for the 2nd floor. My home entertainment center is in the family room. I’ve got an old Mac Mini being used as a HTPC (home theatre PC) that I definitely want to wire. You can see the outlet I made right below the mounting piece. Behind the cloth and resting cat is a small stand where the other end comes under. It ends up being a much cleaner look when done. The mounted TV will hide the wires.
Cat is hard at work…

The hole I drilled from the 2nd floor to the attic was not big enough for all the Ethernet cables. I had to drill another one.

Drilling holes in the floor board of the 2nd floor to drop into the garage. I don’t know what happened but the first hole I tried to drill (left) was a dud and I could not get the bit all the way through. I moved over and drilled another one.
Garage

View of the garage where the drop from the 2nd floor comes. I used a ladder to climb on top of the freezer and drill holes. You can see the existing coaxial run over and down. This is the path all the 1st floor wires would take.

Drilled another kinda-circular hole for a grommet. Same thing as the attic – add insulation when done.
First Floor

Invaluable! Drywall saw. Draw and score drywall for cutting then make the hole.

Mounting bracket going on. Pencil marks can be erased. We painted this room afterwards anyway.
Finished Goods
It felt good finishing this project. Here are some finished pictures.

The end result of one end of the wiring.


The finished connection looks clean and sweet! I have a spreadsheet tracking the cable numbers so I know where every wire goes. I chose not to put labels on the wall plates for that purpose.
Cleanup
By now you might have noticed I put some big holes in my walls. Don’t worry – I patched them up.

I bought a single square sheet of drywall and used it to cut the sizes I needed. I measured, cut, shaved sides, and then put the mounting bracket in it before attaching to the wall.

Finished top piece. We plan on painting so not a big deal right now.


Next is to connect keystone jacks to the wires and put a wall plate on. The excess Ethernet cables can be shoved back into the wall. Always err on the side of giving yourself too much cable.
Bloopers and Missteps
I broke a flexible drill. It was way harder to drill through floors than I thought. To be fair I purchased a cheap one and it got stuck then broke in a footer.
Bare Wire
During the fishing and pulling some cables were worn bare. Unfortunately we bound cables together with plastic cable ties. When we pulled them through holes this is what happened.
Pro Tip: if you ever need to fish wires please do not attach the plastic cable ties. They are hard to fit through holes and will damage your cables.

A couple new wires had to be run to replace these bad ones. The bad cables needed to be removed too.
Plastic Cable Ties
During the planning phase I thought these plastic cable ties would be perfect for bundling together multiple ethernet cables. I was wrong – big time. Do you see the little square that connects the plastic tie? That caused some trouble and more work. I ended up using Velcro cable ties which worked much better. Also black electric tape – lots of that.

Tags on Cable
During the planning I knew I needed a way to tell which wire was which. When you run through floors and deep into an attic it isn’t easy to check by hand. I decided to use cable labels to write down which line each was. I assigned each a number 1-n.

The problem was that during the pulls some labels would fall off. Fortunately enough of the cables running to an outlet were there to figure out what the missing ones actually were.
Was Wiring the House Worth It?
Yes. I don’t recall what my speeds were with WiFi but this is much better. Netflix buffering? Nope. Dropped connections / packets? Reduced. Speed? Faster.

Check out all 68 pictures I took on Imgur.Thanks for reading!
Tech flex is your friend
Like this? https://www.amazon.com/Techflex-Split-Sleeving-feet-Black/dp/B0008JF8UK
I’d need a lot of it but yeah maybe it would have prevented some wire damage. Thanks for reading!
Great article! What’s the purpose of the patch panel? How come not directly to the switch?
A patch panel isn’t necessary but does help to create a clean and easy way to manage your ports. You won’t have to crimp and put the RJ45 connectors on – just punch down into the patch panel. It can give you more organization and control. Optional but I like it.
Hey nice you shared all the details with pictures but just 1 thing; you have more than enough room there to install a small wall mount rack and move all the gear there to make it look and organized even better.
Yeah that is a good idea. I was actually thinking about doing that.
[…] you liked looking at the fish photos then have a look at my Ethernet Home Wiring Project. There are tons of good photos of the […]
[…] If you liked this post and enjoy looking at a lot of pictures then you might also like: My Project: Wired House for Ethernet Cat 6 […]
How many feet of wire did you use for the whole house?
Thanks.
I bought 2 boxes of 500 foot wire. So 1000 feet. I estimate I used about 700 feet. I have 3000 square feet spanning 3 stories plus a crawl space under the house. YMMV.
What was the longest length of cable segment you ran? Any concerns with that? First-timer, very motivated by your post! Thank you!
Not exactly sure but some were really long. A few had to be run from the attic down 2 flight and then down into the basement. Probably a hundred foot? I got 2 boxes of 509 foot and used most of it.
[…] If you liked this post then you might also like: My Project: Wired House for Ethernet Cat 6 […]
I’m looking at doing this myself too.
As far as mapping this overall… Is this right?
Service to house,
…to modem
…to Ethernet switch
…to patch panel?
Then out of the patch panel, you go to the Wifi router, and to each drop?
The way I did it:
service line –> modem –> router –> switch –> patch panel –> client devices
[…] If you liked this post then you will enjoy this: My Project: Wired House for Ethernet Cat 6 […]
[…] If you liked this post then you might also like: My Project: Wired House for Ethernet Cat 6 […]
Can I ask why the switch? Why not directly from the router to the patch panel? Is that an option if the router has enough ports?
Most routers have maybe 4 ports for Ethernet besides incoming. With over 20 drops I need more. Switches are nice especially if managed to control the network better. The extensibility of a switch and patch panel is helpful keeping things in good clear order. Also easier to change later.
This has walkthrough been a big confidence booster for myself. I am about to update all old flat4 phone cable to ethernet, and it has to start in the basement and go upwards to the living areas. Did you have to go horizontal through any ways or did your attic provide enough space to drop down for each one?
Thanks!
Awesome! I’m not the most mechanical guy but I felt this was a challenge I could take on. I am glad to hear it boosted your confidence enough to give it a try. Now onto your question…
Use gravity to your advantage. We want to drop wires down. It is much harder to fish wires up. The only horizontal areas I needed to go through were in my attic and crawlspace – which was much easier than having to go sideways through walls. I was fortunate that I didn’t have to go through a wall sideways and work my way through each stud every 16 inches.
Have been reading this with amusement 🙂
Currently I am completing the one I live in (Victoria, Australia). I am jealous of your internet download speed!
[…] My Project: Wired House for Ethernet Cat 6 […]
Just saw your post. I want to connect a new computer to our router in the basement. I found an existing hole to feed the cable through but read somewhere that it should not go parallel with other wires. Do you know if that is true.
I remember reading mixed things when I was researching how to run the wires without interference. For me using simple UTP without shielding has worked very nicely. My runs were not with electrical or other cables so i doubt there is much of a disadvantage to it. Bottom line – I doubt you’ll need shielded ethernet cables and would be fine with UTP.
Where did you get the grommet and what size is it? Finding one of these online seems harder than it should…or I don’t know what I am looking for.
I purchased from Amazon. Here’s the 2 kinds I got:
https://www.amazon.com/gp/product/B01E11DP7I/
https://www.amazon.com/gp/product/B007CI3XL6/
The size you get depends on just how many wires you plan on running through it. I was concerned that they would be too small but after I measured it was plenty big enough.
What router did you use? I have a modem and switch ready but didn’t think about the need to DHCP the IP addresses
Get yourself a good ac router. I’m partial to TP-Link for home use. I like Asus too.
Lastly, you might want to check out Ubiquiti if you’re aiming for a whole home system or small business.
Great walk-through, Jeff. I have a ranch home and recently ran cat6 from Fios box in garage to router near center of home and then two lines to our home office. My wife runs a data company from our home so we needed hardwired speeds. We have 1 GB service and roughly 800Mb Up and 750Mb Down now. We have a sizable attic, so we routed cabling through attic. I found it was easier to fish cables from above as the fish tape was more easily controlled from above as opposed to the cat6. I would use electrical tape to secure cat6 to fish tape and had a second person helping to feed cable from box to avoid kinks. I also opted for STP cable over UTP, which made it a bit less pliable, but still manageable. All in, it took use about 1/2 of a day to complete the project. Like you, I also took opportunity to bury TV power and HDMIs behind wall under TV. I am very pleased with the outcome.
Hey! Thanks for stopping by. You finished that project very quick! It took me longer but the results are worth it. It is so much better having a wired connection: faster, more reliable, and more secure. I only use WiFi for mobile devices or devices which don’t have an ethernet port. Also isn’t is surprising how much better it looks to run TV wires in the wall instead of showing? Sometimes it is the small things that make the biggest difference.
[…] My Project Wired House For Ethernet Cat MlakarTechTalk. Last Year I Completed A Project In My House To Wire Most Of It With Cat Ethernet CableSee How I Did It With Lots Of Pictures mlakartechtalk.com […]
[…] If you liked this post then you might also like my previous post on My Project: Wired House for Ethernet Cat 6. […]
[…] My Project: Wired House for Ethernet Cat 6 […]
[…] to drill holes through the walls and run wires across the place. In my case, I rather enjoyed a home project to run ethernet cables across 3 […]